
Template Flows
Join a template's pages into one video with transitions, then render a video for every row of a batch.
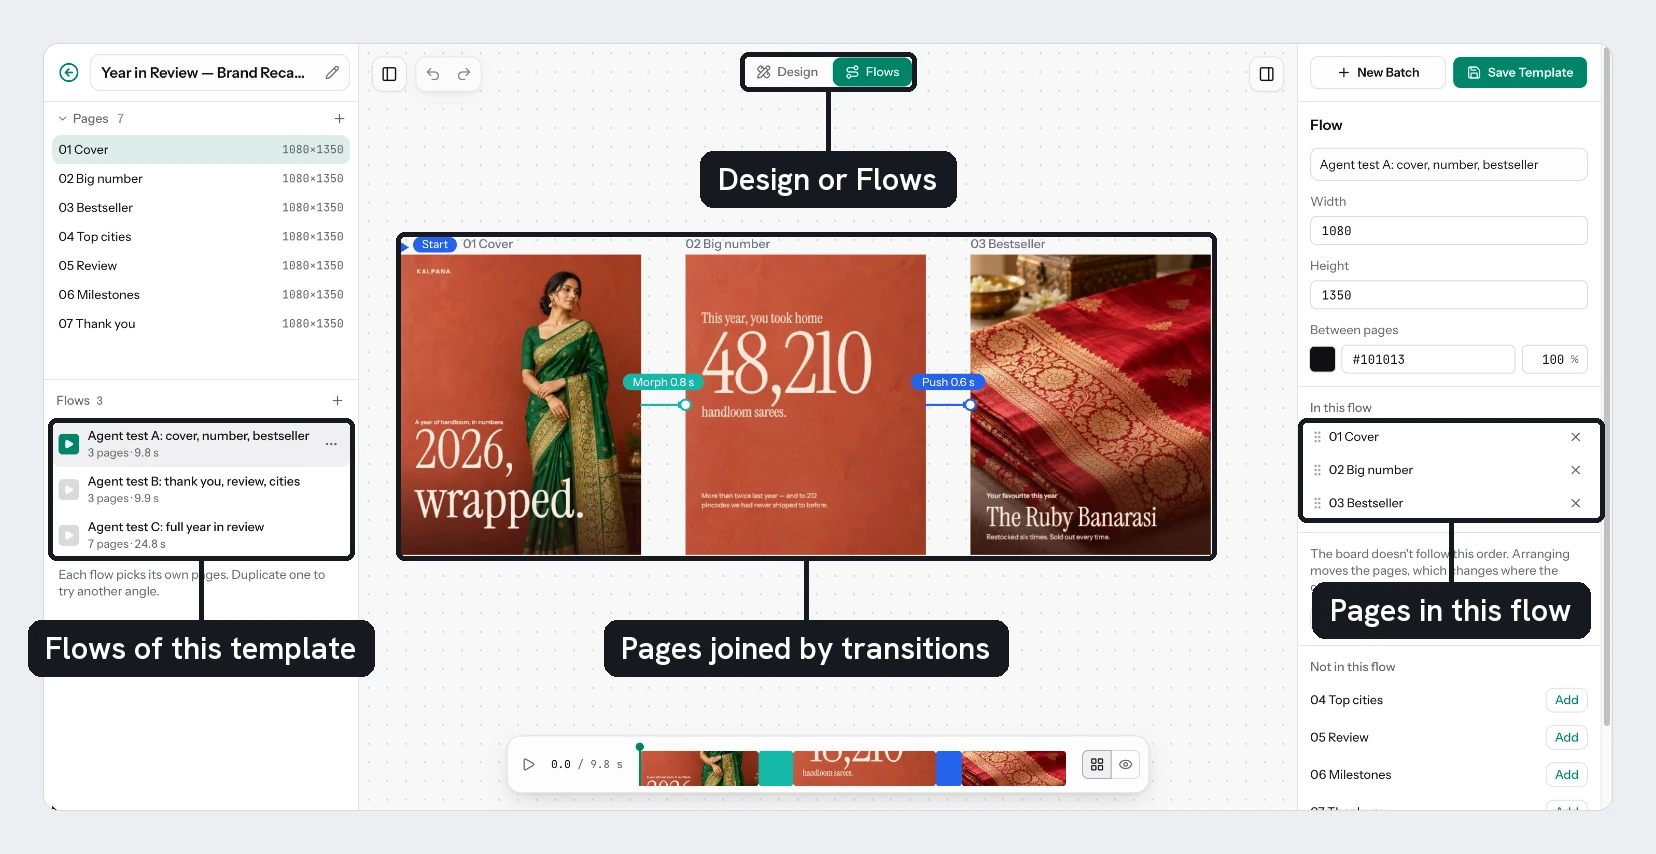
A flow joins some of a template's pages into one video. A template can hold many flows, and each picks its own pages, so one template can give you a 15-second teaser and a 30-second walkthrough from the same design.
Create a flow
Open Flows
In the designer, use the switch at the top of the canvas to change from Design to Flows.
Add a flow
Choose the + beside Flows in the left panel and name the flow. Set its Width and Height in the right panel.
Add the pages
Choose Add all to start with every page, or use Add under Not in this flow in the right panel, and drag them into order under In this flow. On the board, you can also drag from a page's knob onto another page to connect them. Each page plays its own animation, then holds for the time you set before the next one arrives.
Choose the transitions
Select the connection between two pages and pick how the next one arrives.
Transitions
Flows have 22 transitions.
| Transition | What it does |
|---|---|
| Fly | The camera flies across the board to the next page |
| Morph | Layers with the same name glide from one page to the next, and the rest fade |
| Dissolve | The next page fades in over this one |
| Cut | Straight to the next page |
| Push | The next page slides in and shoves this one out |
| Cover | The next page slides in over this one |
| Wipe | A hard edge crosses the page, showing the next one behind it |
| Dip | Dips to a colour, then comes up on the next page |
| Whip | A very fast push, smeared by motion blur |
| Flip | The pages turn over like a card, back to back |
| Cube | The pages are two faces of a turning cube |
| Zoom | This page grows away while the next one fades up from a little smaller |
| Zoom through | The camera passes through this page to the next one |
| Blur | This page blurs out while the next one comes into focus over it |
| Iris | The next page opens through a growing circle |
| Clock | A hand sweeps round, showing the next page behind it |
| Flood | A circle of colour floods the page, then fades off the next one |
| Rings | Rings of colour grow from the middle, then close on the next page |
| Stripes | Tilted bands of colour sweep across, one after another |
| Blades | Two panels of colour slam shut and part on the next page |
| Burst | Rays shoot out of the middle, then a circle floods the page |
| Pixel | Rows of colour step across in hard blocks |
Push, Cover, Wipe, Whip, Flip, Cube, Stripes and Pixel have a Direction. Dip, Flood, Rings, Stripes, Blades, Burst and Pixel have a Colour: pick a solid colour or a gradient, and lower its opacity to make it see-through. Some have more: Starts from (Iris, Flood, Rings, Burst), Starts at and Turns (Clock), Order and Block (Pixel), Close from (Blades), and the number of Rings, Stripes or Rays, with Lean for Stripes and Ray for Burst.
Transition settings
Select the connection between two pages to edit it:
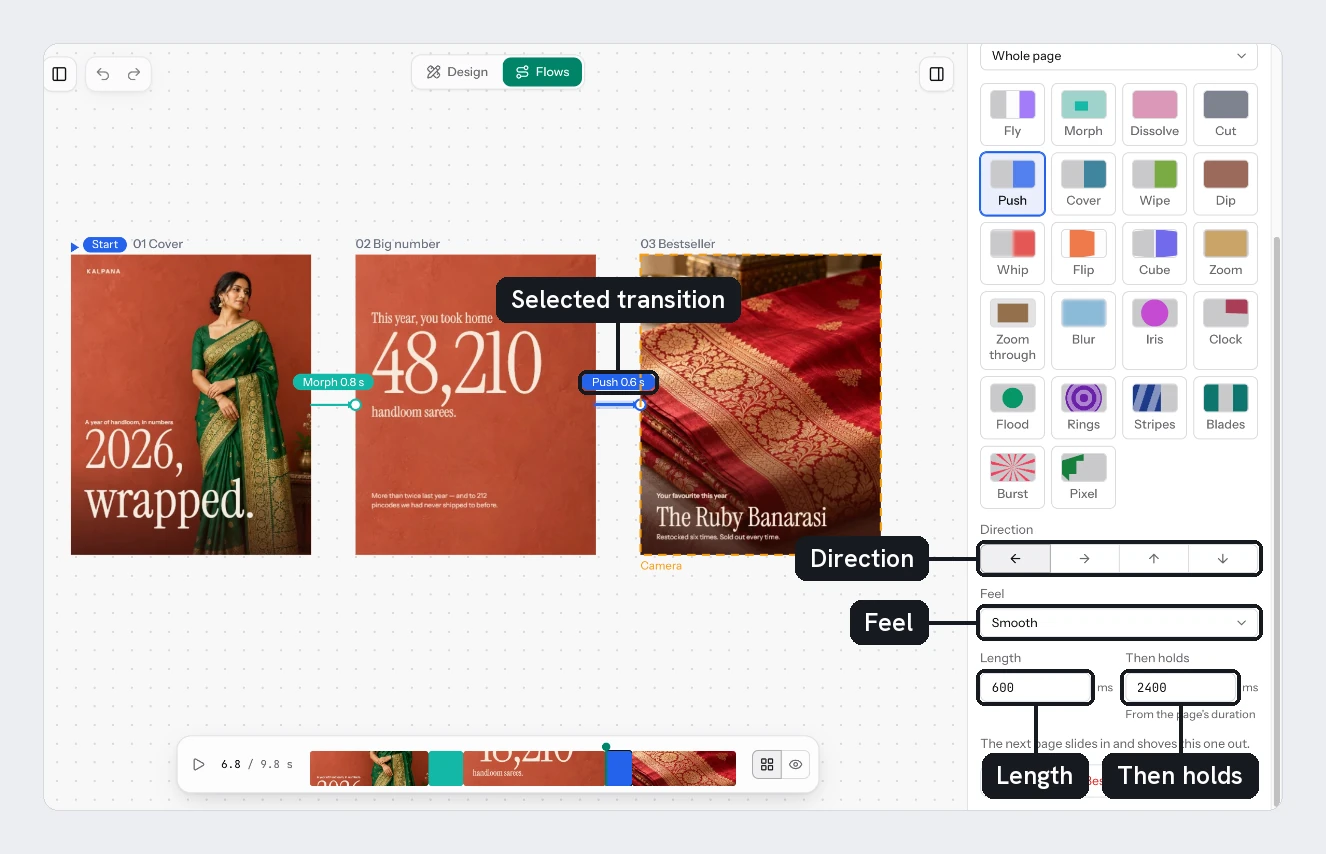
- Goes to changes which page the arrow lands on. You can also drag the dot at the arrow's end onto another page.
- Feel is smooth, gentle, snappy or bouncy, and Length is how long the transition takes in milliseconds. Cut has neither.
- Then holds is how long the next page stays. By default it follows that page's own duration; Use the page's duration goes back to that.
- Tilt tilts the camera on a Fly, from -60 to 60 degrees.
- Travel makes the pages slide on a Morph the way they sit on the board.
- Skip its animation, when a page appears twice, shows it at its still time instead of playing its motion again.
When both ends of a connection are on the same page, only Fly and Cut can be picked, because there is nothing to blend. Pick another page in Goes to for the other transitions.
Page settings
Select a page to set Holds for and its Camera. Camera frames the Whole page or one of its layers. A layer gives a close-up, with Padding in pixels around it and Zoom as a percentage, and the board draws what the camera frames. Every transition works between a close-up and another page.
Flow settings
With nothing selected, the right panel holds the flow's name, Width, Height, what shows Between pages and its pages, with Duplicate flow and Delete flow. Between pages can be a solid colour, a gradient or an image, and an image can fit the frame or tile.
Play and adjust
The strip under the canvas plays the flow. Drag the end of a hold to lengthen it, drag a transition to slide it, and drag a hold sideways to reorder. Board and Preview switch between the map of pages and the video. The left and right arrow keys go page to page, and Escape returns to the board. Flows have their own undo and redo.
Render a flow in a batch
A template's flows appear as tabs in the batch builder, beside its pages. Choose Add flow to put one in the batch. Flows start out of the batch, because a video costs more than an image.
A template with several pages gives each page its own columns, named page1@title, page2@title and so on, and a flow reads the same columns as its pages. If your sheet has a plain title column, it fills every page that has no column of its own. So title alongside page2@title gives page 2 its own text and every other page the shared one. Each row then renders its own video, and the flow's format menu offers video formats only. See Output Formats for the formats and what they cost.
Length
Videos run up to 60 seconds. A flow's length comes from its pages, so a longer flow is not refused, but only its first 60 seconds render.
With your assistant
The designer connection creates and edits flows, and the batch connection renders them. See Designer MCP.
Updated 4 Nov 2026